HTML Image Maps
There are two types of image maps available in HTML, client-side and server-side. Server-side image maps are more difficult to use, require a program on the server to interpret their data, and present accessibility problems. For those reasons, most HTML image maps are implemented as client-side. That is what this web page will cover.
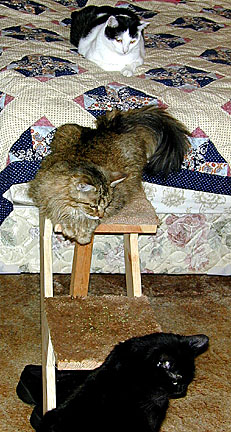
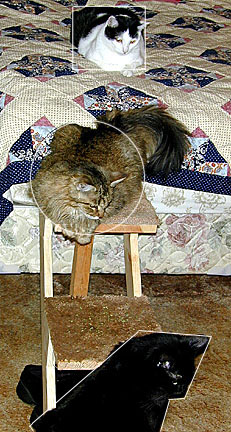
There are two pieces to an image map. The first is the picture which you want to create "hot spots" (areas that act as links) on. The second part is the map that defines those areas. The image is associated with the map using the usemap attribute. For our example, we will use an image of cats gathered around a special staircase built just for them. The image on the left is the original. It is also linked to the picture itself. The picture on the right shows what areas we want to be hot spots. Notice that there are three different shapes being used: a rectangle, a circle, and a polygon. These are the three types of shapes supported in client-side image maps.
Inserting the image into a page
There isn't much special about placing the image into a web page. You still use the standard img tag. Generally, you set border="0" to prevent the border from showing up. The only extra attribute you need to add is usemap which tells the browser where the definition of the hot spots is.
In this case, we will use the following HTML code (the '#' sign in front of the map's name indicates that the map is on the current web page):
<img src="ladder.jpg" border="0" usemap="#catmap" />
Figuring out where the hot spots are
It helps to have additional software to figure out where the hot spots are. Some of the easiest products to use are Screen Ruler (http://www.microfox.com/) and JR Screen Ruler (http://www.spadixbd.com/freetools/jruler.htm). I have found it much more reliable to download JR Screen Ruler from other download sites such as http://www.tucows.com. The screen rulers help pick out the exact coordinates of our shapes.
As stated previously, HTML client-side image maps support rectangles, circles, and polygons. The origin of the coordinate system starts in the upper-left corner of the picture. The X-axis is positive to the right, while the Y-axis is positive toward the bottom. We need to supply different coordinates for each type of shape:
- rectangle: upper-left corner (x, y), lower-right corner (x, y)
- circle: center (x, y), radius (length)
- polygon: a list of points (x, y) in either clockwise or counter-clockwise order [Note: The shape should not be closed. Do NOT relist the first point.]
Using a screen ruler, we get the following coordinates (please note that the coordinates do not have to be exact to appear precise to the user):
- top cat - 73, 8, 145, 69 (upper-left, lower-right)
- middle cat - 87, 178, 78 (center point, radius)
- bottom cat - 35, 432, 30, 427, 141, 329, 212, 336, 184, 397, 170, 398, 160, 432 (a list of the coordinates in clockwise order around the shape)
Creating the hot spots (the map)
Creating the hot spots (the map) requires two diferent HTML tags, map and area. The map tag contains the area tags which define the individual hot spots. The map tag must contain an attribute identifying it by name. Due to differences in HTML versions, it is suggested that you specify the name twice using both the name and id attributes.
Each hot spot is defined with its own area tag, which is contained within the map element. Each area tag should set the attributes shape, coords and href. The shape and coords were just discussed. The href attribute specifies what the area is linking to. Additionally, you can specify that there is no link (nohref), that the link should open in a specific target (target), and alternate text alt.
Here is what the HTML code looks like for our image map:
     <map name="catmap" id="catmap">
        <area shape="rect" coords="73,8,145,69" href="kr_iron2.jpg" target="cats" alt="Krissy" />
        <area shape="circle" coords="87,178,78" href="kpic.jpg" target="cats" alt="Kelly" />
        <area shape="poly" coords="35,432,30,427,141,329,212,336,184,397,170,398,160,432" href="tpic.jpg" target="cats" alt="Trouble" />
     </map>
Note: Although rect, rectangle, circ, circle, poly and polygon should all be valid as shape names, I tend to limit myself to using rect, circle, and poly based on my experiences with older browsers.
Our image map in action

HTML Goodies Image Map Tutorial
http://www.htmlgoodies.com/tutors/im.html opens in a new window.
Image Map Exercise
Image map exercise opens in new window.

