Access FAQ
These notes are posted to answer frequently asked MS Access questions.
These notes are posted to answer frequently asked MS Access questions.
In table datasheet view, you can right click on a column header to display a context menu which contains the option to rename the field. The following image shows the ID field ready for the Rename option to be selected.

You rename a field and type in the camel-cased version of the name. See the rename question for details on renaming a field.
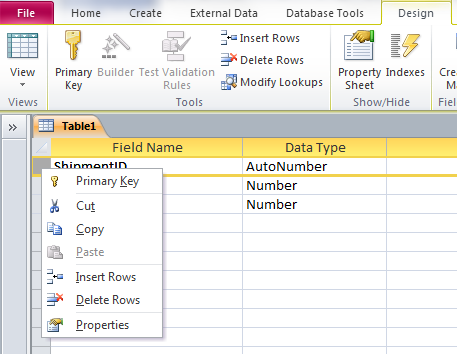
You can use table design view to make a field a primary key. Right click the field name and you can choose Primary Key from the context menu. Alternatively, you can select the field and then click on the Primary Key icon in the Office ribbon.
In table design view, you can set a field's data type using the drop down list in the second column of the design grid. The following image shows the drop-down list when the second column of the Quantity field has been selected.

In table design view, you can set a field's properties by clicking on the field and then modifying the properties in the properties list at the bottom of the design grid. You can set how the field will be displayed (format), the number of decimal places that will be shown, the size of a field, whether or not a field is required, a default value, and much more. The following image shows the properties for the Quantity field. Notice that it is set to be a Long Integer, has no default value, and is not a required field.

Fields have a property named "Required". Open the table in design view and set the "Required" property for that field to "Yes".
A field's format is one of its properties. You can change the format from the field's properties in table design view. See the answer about changing field properties for more information.
Assume you have the following table named Grades.

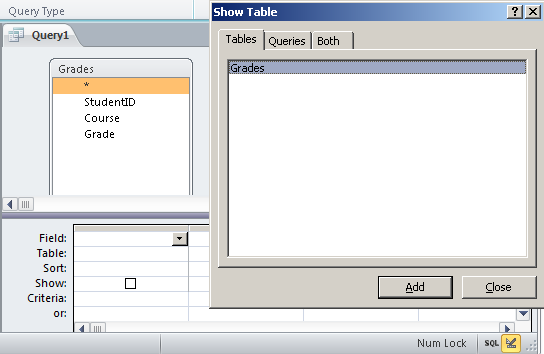
We want to create a query to find all students who received an A in MGT130. The first step is to create a query in query design view and add the Grades table to the query. We have to add all the tables and queries that contain data we want to query. In this case, that is only the Grades table. If you need to remove a table, you can right click on its representation in query design and remove the table. If you need to add another table later, you can right click in a blank spot in the design view and choose "Show Table...".
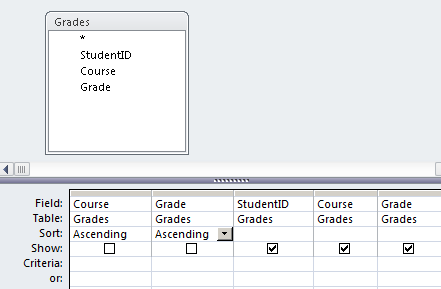
The next step is to add the fields you want involved in the query. This includes all fields that you want to display, sort on, filter the results by, find a minimum, find a maximum, etc. In this case we want to add all three fields from the Grades table. You can click and drag them to the design grid, or you can just double click a field to add it to the design grid. In this example, we want to sort by Course and then Grade and then StudentID, but we want the fields to be displayed with the StudentID first. It is a little unusual to sort in a different order than the fields are displayed, but it is easy enough to do. In this case, we can add the sort fields first and use them for sorting, but choose to not display them.
If we only want to see the records for those students who earned an A, then we can add "A" to the criteria row for the Grade field.

If we only want to see the records for those students who earned an A in MGT200, then we can add the criteria "MGT200" for the Course field. Please note that there is really no need for sorting on the Course field any more, but there isn't any harm in a table this small.

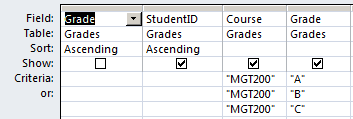
If we want to see all the records for students who earned an A, B, or C in the MGT200 course, then we can add additional criteria rows. The results will show any records that match any of the criteria rows. In this case, the sort on the course has been eliminated and a sort on StudentID within Grade has been added.
Those are easily done using aggregate functions. See the next question and answer for a description of how to use aggregate functions.
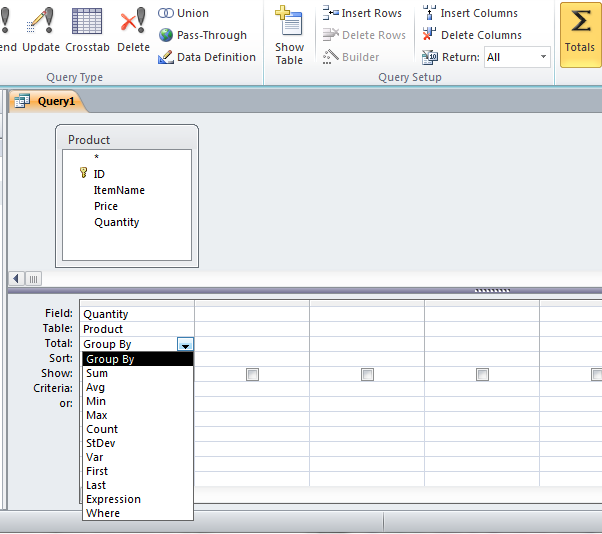
Aggregate functions are built into Access. To use one in a query, switch to query design. Add the field you want to use an aggregate function on to the query. Then click on the Totals icon in the ribbon to open up a new row in the query design grid. The name of the new row is total. You can then choose the aggregate function you want by selecting it from a drop down list in the Total row of the column representing the field you want to use the function on. In the example below, the designer is set to choose an aggregate function for the Quantity field.
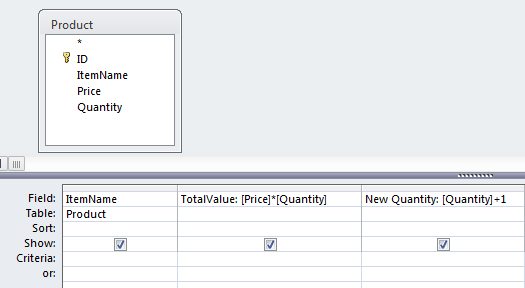
A calculated field can be created in query design view. In a new column you can enter a formula where the Field name would usually go. Your formula can include any fields from included tables by using the field's name surrounded by square brackets. You can also use numbers just as they would normally appear. For arithmetic operations, the traditional +, -, *, and / can be used. Access will automatically add a name for the column (Expr1, Expr2, etc.). Names of columns can be specified by adding a name followed by a colon before anything else in the Field row of a query design column. The following example shows two calculated fields, one named TotalValue, and one named New Quantity. The TotalValue is just the Quantity multiplied by the Price. The New Quantity is 1 added to the existing Quantity.
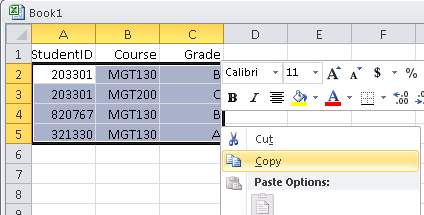
Select the data you want to copy from the Excel worksheet by clicking and dragging to select the specific cells. Then right click and choose "Copy" from the context menu. This copies the data to the clipboard.
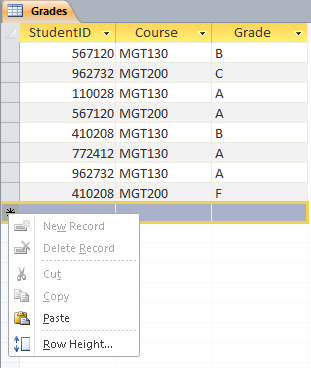
Then go to the Access table you want to add the data to. Make sure you are in Datasheet view. Right click on the asterisk (*) in the row header and choose "Paste" from the context menu. A dialog will pop up asking if you are sure you want to paste the records. Once you click on "Yes" the data is added to the table.
You can import a table (or tables) into Access using the tools in the Import & Link group on the External tab on the Office ribbon. The most common imports have large icons. Lesser used import formats are listed in the More drop-down list. Once you click on one of the import/link icons, you will have to browse for the file on your machine. Then you have to choose whether to import or link the data. Links retain an active connection to the original file. An import actually makes a copy of the data so you don't have to worry about what happens to the original file.
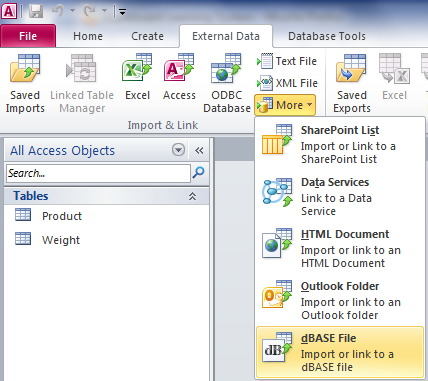

A .dbf file is the old standard dBase file format. It is available as a regular external data import under the More drop-down list. See the answer about importing a table.
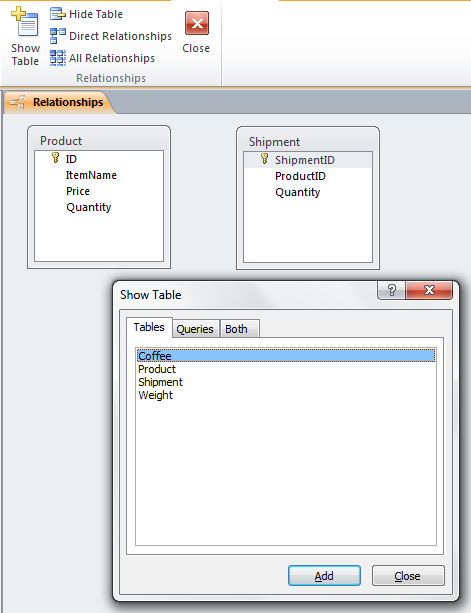
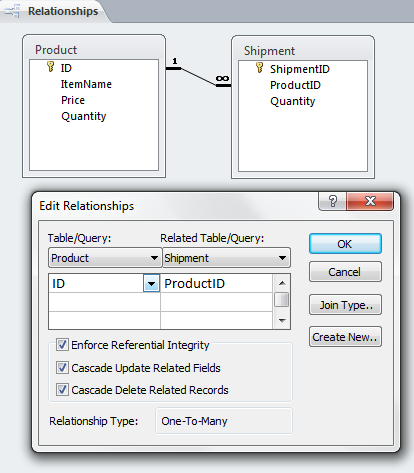
To create a relationship between tables, first close all open tables, queries, reports, and forms. Then click on the Relationships icon on the Database Tools tab of the ribbon. The Show Table dialog should appear. If it doesn't, you can click on the Show Table icon in the ribbon. Double click on the tables you want to relate to add them to the Relationships work area. To relate two fields, drag from one field to the field you want to relate it to in another table. Drag from the primary key field to the non-primary key field. Once you do that, the Edit Relationships dialog should appear. You will often want to check all of the Referential integrity options for the relationship in that dialog. Once you are done, close the Relationships work area.

Add the field you want to work with to a query in design view. Getting the minimum or maximum of that field involves using an aggregate function. See the answer about using aggregate functions.