This is a surprisingly common problem. Just double-click on one of the tabs (File, Home, Insert, etc.) to make the ribbon reappear (or make it disappear again).
Don't open your file directly from a browser. Download the file (save it) first, and then open it with Word. If you cant' find the file, see the question on finding your file.
You should consider taking CIS 101 (Introduction to Computers). Basic knowledge of the filesystem is vital to using a computer. First try reopening Word and finding your file in the list of recently used files using the File tab and then the Recent tab. You can also try looking in My Documents or Documents under your user name. If you do find your file and reopen it in Word, make sure you use Save As to place the file in a known location with a known name.
The incorrect way is to just insert paragraphs by pressing the Enter key until the text is at the start of the next page. This method usually fails as soon as previous text is changed or reformatted. The correct way is to insert a page break. You insert a page break by clicking on the Insert tab and then clicking on Page Break in the Pages grouping.
There are a couple of ways of doing this. If you are creating a report with no specific requirements for the cover page, then you can click on the Insert tab and then click on Cover Page in the Pages grouping. This allows you to select from many different styles of cover page. If you have specific requirements for the cover page (such as the Word assignment in the CIS 101 and CIS 123 courses often do), then this method should NOT be used. In this case you will want to create the cover page manually. To do this, just create the content of the cover page just like any other page. When you are done, be sure to insert a page break at the end of the content.
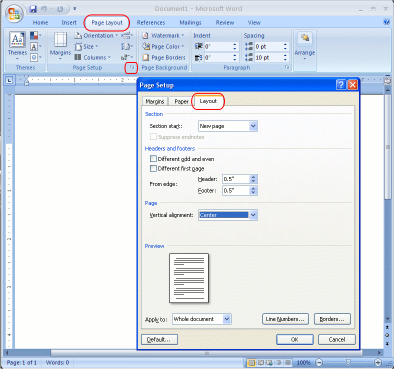
Creating a cover sheet
- Position insertion point at start of document
- Go to Page Layout tab; open Page Setup Dialog, Click on Layout tab
- In the Page section, set "Vertical alignment" to "Center"
- In the Headers and Footers section, select "Different first page"
- Click OK
Ending a coversheet
- Position insertion point at end of cover sheet
- Insert a page break (not shown in picture): Insert tab, Page Break
- Go to Page Layout tab; open Page Setup Dialog, Click on Layout tab
- In the Section section, make sure "Section start" is set to "New page"
- In the Page section, set "Vertical alignment" to "Top"
- At the bottom of the dialog, set "Apply to" to "This point forward"
- Click OK
Most people do this by inserting empty paragraphs at the start of a page (by pressing the Enter key several times). This is incorrect. To center text vertically, click on the Page Layout tab, and then click on the arrow in the lower right corner of the Page Setup grouping to open the Page Setup dialog. In the Page Setup dialog, you can choose vertical centering in the Page section of the Layout tab. Be careful what you are applying it to.

Place your insertion point somewhere in the paragraph you want to change and then select the appropriate option from the Paragraph grouping in the Home tab.
To modify existing text, select the text that you want changed and then select the appropriate option from the Font grouping in the Home tab. To modify text you are about to type, just select the options you want from the Font grouping in the Home tab.
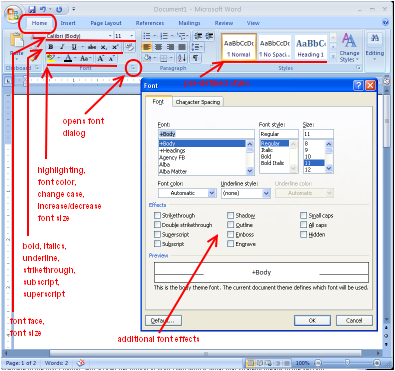
- Select the text you want to format
- Go to Home tab
- You can click on buttons in the Font grouping to change font characteristics.
- You can also open the Font dialog box to get additional features to select.
- You can also select a pre-defined style to apply a number of pre-defined changes all at once.
To modify existing text, select the text that you want changed and then select the appropriate option from the Font grouping in the Home tab. To modify text you are about to type, just select the options you want from the Font grouping in the Home tab.

- Select the text you want to format
- Go to Home tab
- You can click on buttons in the Font grouping to change font characteristics.
- You can also open the Font dialog box to get additional features to select.
- You can also select a pre-defined style to apply a number of pre-defined changes all at once.
Click on the Page Layout tab. If the margins you want to set are common, then you can select them using the Margins button in the Page Setup grouping. If you want more control over the margins, then open the Page Setup dialog using the arrow at the lower right of the Page Setup grouping. In the Page Setup dialog, click on the Margins tab and setting the margins should be obvious at that point. An image is provided below.
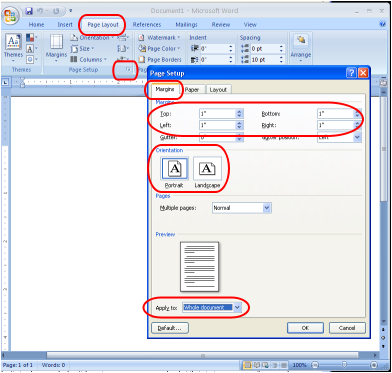
- Position insertion point at start of section you want to change margins for
- Go to Page Layout tab; open Page Setup Dialog, Click on Margins tab
- In the Margins section, set the "Top", "Left", "Bottom", and "Right" values
- In the Preview section, select whether you want to apply this change to "This section", "This point forward", or the "Whole Document"
- Click OK
The orientations are portrait (taller than wide) and landscape (wider than tall). Click on the Page Layout tab. Then open the Page Setup dialog using the arrow at the lower right of the Page Setup grouping. In the Page Setup dialog, click on the Margins tab and choose the orientation you wish in the Orientation section.

- Position insertion point on the page where you want to change the orientation
- Go to Page Layout tab; open Page Setup Dialog, Click on Margins tab
- In the Orientation section section, choose Portrait or Landscape
- In the Preview section, select whether you want to apply this change to "This section", "This point forward", or the "Whole Document"
- Click OK
The incorrect way is to use spaces or a tab. The first line indent should be automatic. It can be set by clicking on the Home tab, and then opening the Paragraph dialog box by clicking on the arrow in the lower right corner of the Paragraph grouping. Choose the Indents and Spacing tab in the Paragraph dialog. In the Indentation section under Special, choose First line. Then to the right of that, choose the amount of indentation you want. The other indentation settings (Left, Right) will often be 0. Do NOT add additional left indentation unless you really want the extra indentation.
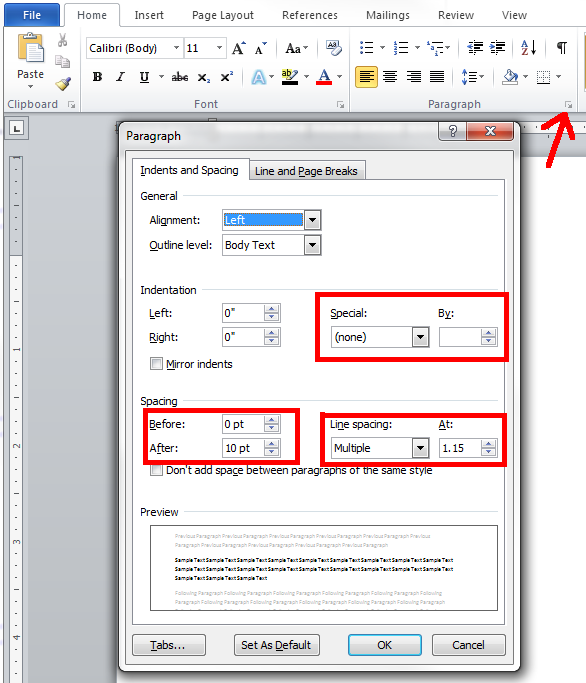
The correct way is to use the Paragraph dialog. Click on the Home tab, and then opening the Paragraph dialog box by clicking on the arrow in the lower right corner of the Paragraph grouping. Choose the Indents and Spacing tab in the Paragraph dialog. In the Spacing section you can set the spacing before and after the paragraph and also the line spacing within the paragraph.

You can do that using the Paragraph dialog (see the question on changing space before and after a paragraph for details). You can also change the spacing quickly by clicking on the Home tab and using the Line Spacing button within the Paragraph grouping. That same button also gives you access to some limited changes to spacing before and after a paragraph.

The easy shortcut is to double-click near the top or bottom edge of a page. This changes the editing so you are now editing the header or footer. You can also click on the Insert tab and then choose what type of header or footer you want using the Header and Footer drop-down list buttons.
Once you are editing a header or footer, click on the Design tab and you can use the Different First Page checkbox to make that change or you can do the following:

- Position insertion point at start of document
- Go to Page Layout tab; open Page Setup Dialog, Click on Layout tab
- In the Headers and Footers section, select "Different first page"
- Click OK
That's a good question because few things are more irritating than having someone manually type page numbers into a document and show how little they understand word processing. The page numbers are placed in a header or footer, so start by editing either the header or the footer of a page. Then click on the Design tab and you can select the Page Number style you want using the Page Number drop-down list button.
Do NOT try to do it using your own formatting techniques. You need to use Word's built-in footnoting so that the numbering stays consistent and footnotes end up on the correct page. It is very simple to insert a footnote properly. Position the insertion point so it is at the point in the text that you want the footnote to refer to. Then click on the References tab and click on the Insert Footnote button. Type up your footnote text and then just click back in the document body when you are finished typing your footnote text.
Do NOT type in numbers and then the list items. You want to use Word's automatic list capabilities. Click on the Home tab. In the Paragraph grouping there are several drop-down list buttons that let you choose the style of list that you want. Word includes buttons for quickly creating unordered list, ordered lists (using either numbers or letters), and even multi-level lists. Once you select the type of list you want, just enter the list item text and press the Enter key between list items. When the list is done, just click on the drop-down list button again to end the list.
Click on the File tab and then on the Info tab. On the right side is the properties pane. Choose either option from the Properties drop-down list button to be able to modify document properties. Choosing the Show Document Panel option gives you quick access to the most commonly changed properties.
Click the Insert tab on the ribbon. Then choose Insert Table from the Table drop-down list button. You can then enter the number of rows and columns you want and click OK. You can also select the table size from the grid on the Insert Table menu if your table has ten or less columns and eight or less rows.


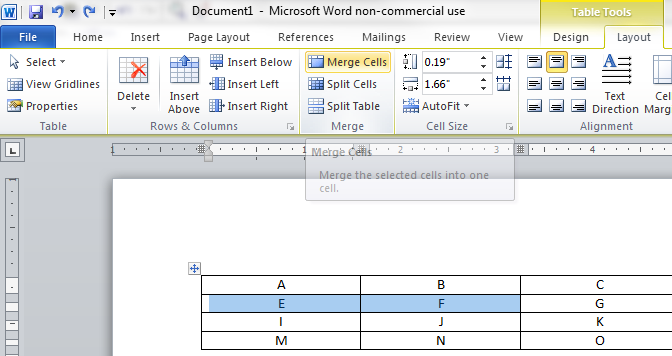
Select the cells you want to merge. Then click on the Table Tools Layout tab. Then click on Merge Cells in the Merge grouping.
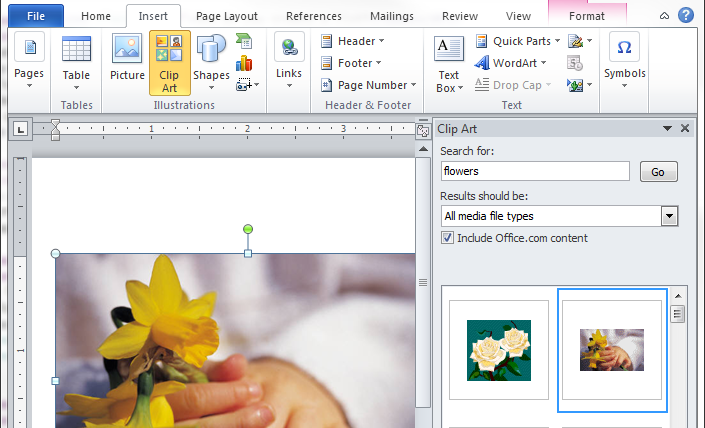
Click on the Insert tab. Then click on the Clip Art button in the Illustrations grouping. In the Clip Art panel on the right side of the window, enter a topic you want to search for. Click on Go and you should get a list of clipart images. Click on the one you want to insert and it should appear in the document where the insertion point was.
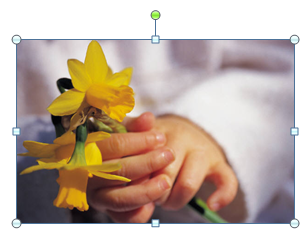
Click on the clipart you want to resize. Sizing handles should appear on the sides and the corners of the image. Click and drag on one of the handles to resize the image. You can also click and drag on the handle above the image to rotate it.
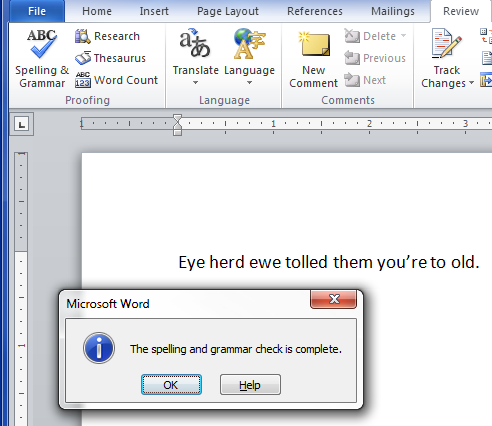
Click on the Review tab and then click on the Spelling & Grammar button in the Proofing grouping. Note that the check is rather basic and does not guarantee the text is correct. The example below makes no sense and uses incorrect words, but still managed to pass the spell and grammar check that was run on it.
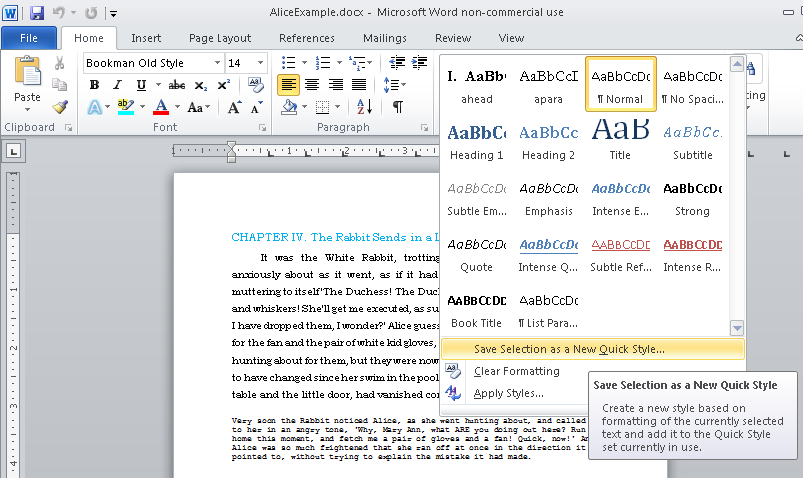
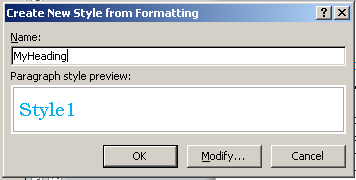
To create a style, modify a section of text, such as a paragraph to be the style you want. That would include font face, font size, font color, paragraph line spacing, spacing before and after the paragraph, indentation settings, etc. When you are satisfied with your formatting, make sure you have that content selected, and then right click on the selection and choose "Styles", and then "Save Selection as a New Quick Style." A new dialog box will open where you can name your new style. Instead of right clicking on the selection, you can go to the "Home" tab on the ribbon, click on the drop-down arrow on the Quick Styles list, and then choose "Save Selection as a New Quick Style."

It is easy to use a style. Just select the text you want to style and then click on the style you want to make it. The styles are available in the Quick Styles gallery on the "Home" tab of the ribbon. Hovering on a style will let you preview how the style will make the document look.